Gilty Thoughts
By Ben Harris - Monday, January 11, 2021
Firstly, it’s not a typo. I’m talking about “gilt” as in “gilded”—the metallic finish applied to the EDGE of a deck of playing cards. Used to be that you’d only see this type of finish OCCASIONALLY. Such cards were NOT something that you would consider performing with—the back designs often being garish and creating unwarranted distraction from your effects.
Fashion has changed this. Gilding has become the latest fad to be explored by the playing card industry, and it’s everywhere! Colours, too, have expanded from the traditional palette of just silver and gold. Red, blue, green, even black are now filtering into the marketplace.
Personally, I’ve never liked gilded cards. I do love the use of foil on tuck cases and sparingly on card backs, but not the edges. In the past, these gilded decks were never, in my opinion, anything more than novelty cards with very POOR handling characteristics—not performer’s decks.
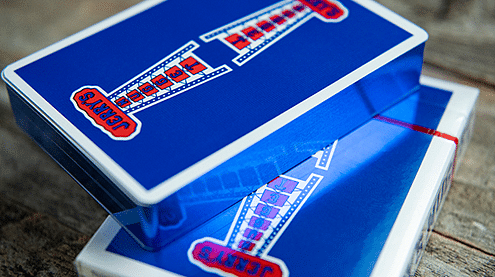
THEN, 5 gilded versions of Jerry’s Nuggets dropped!
Listen, I can appreciate the gilding with Bicycle’s Beekeeper (or even Cybertech), 5th Kingdom, or Vintage Label Playing Cards, etc. But Jerry’s Nuggets? These are a WORKER’S cards with a serious reputation as such. The gilding is unexpected, and I’m not really sure how I feel about it (and how it reflects the legacy). However, I do think this is an indicator that gilding will be with us for a while, and that being said, I wonder what magical effects we can create to explore the trend. Here are some initial thoughts…
** 1. SHARPNESS **
Gilded cards, with their metallic edges imply a sharpness (knife edges). I contend that effects where cards penetrate each other can possibly be enhanced with the use of gilded cards. Card Throwing seemingly becomes more dangerous, or can be made to appear so.
** 2. METALLICNESS **
Gilded cards, when held as a squared deck, look like a block of metal. The only element that ruins the illusion is the deck’s top card. If, for instance, the card backs were printed—full bleed (edge-to-edge) with gold foil—then the said deck would look exactly like a solid block of either gold, silver, or aluminium. There is a Solid Deception (Paul Harris) segue here—not to a glued deck, but to a solid block of steel. Think of it as a heavy-metal version of the Omni Deck. You can also tie this to Industrial Revolution by Jamie D. Grant.
** 3. COLOUR CHANGING GILD **
Imagine changing a silver-gilded deck into a gold-gilded deck by simply forming (and then closing) a simple card fan. Pure alchemy. This uses a a devilish secret from my old friend Steve Duscheck. He originally used it to change a silver coin into a gold one. It is also a trick used in the commercial print industry and you can execute the same trick with the edges of a gilded deck. You’ll require a SILVER gilded deck and a YELLOW permanent oil marker. The fatter the nib on this pen, the better. Do, make sure that it is a “permanent marker.” In addition, we take advantage of the optical fact: You can only ever see 2 EDGES of a squared deck of cards at any one time. Your audience assumes that the 2 invisible edges are the same. They need not be…
Begin by placing an advertising card on both the top and bottom of the deck. These will act as spill guards, ensuring you do not soil the real top and bottom cards with ink. Square the deck carefully, clamp it tightly in your hand, and then using the yellow pen, paint one short edge, go around the corner, and then finish by painting the long edge (all the way down to the next corner). Allow the ink to dry and then discard the protective cards from the top and bottom of the deck. Returning to the deck, you will note that the translucency of the ink allows the silver to shine through—the amalgamation appearing as GOLD. If you do this carefully, starting and stopping at the corners with accuracy, you will have a deck that (depending on orientation) will appear to be gilded either GOLD or SILVER.
To create the magical change, use the simple procedure of turning the deck from end-to-end as you form—and then close—a two-handed card fan. Begin with a SILVER deck, fan it and then close the fan. Now the deck is gilded GOLD. Simple but effective. A little presentation turns it into a magical moment. What’s more, you can continue to perform a few effects with the deck—just be careful with the orientation. A few cards removed from the deck, to use for a packet trick, are completely safe without any concern about revealing the paint-job.
As an additional note, you can change the colour from SILVER to any of the other metallic colours that are now being used to gild decks. GREEN, RED, BLUE, and BLACK all work well—the silver, in all cases, shining through.
** 4. GOLDEN DECK APPEARANCE **
As you caress a regular deck, a GOLD gild magically appears around the edges. It’s pure bluff, but at the right moment it’s a cool and magical moment—an instant “gold-plating” effect.
The secret lies in the fact that a widely ribbon-spread deck is not obviously a gilded deck. The metal is too spread out to be noticed. To make this bluff effective, it is important that NONE of your card magic, leading up to this point, be performed with a gilded deck. NONE OF IT! You do NOT want your audience even aware of such a thing. Perform your set with a NON-GILDED deck that has a back design matching your gilded deck.
During your performance with the regular deck, refer to the magical moments encountered as “golden moments.” This will pre-condition the audience for the gilded-finale. You will need to switch decks at some point—and then configure the GILDED deck into a broad ribbon-spread—all while attention is elsewhere. It’s a matter of timing; a matter of taking advantage of a “down” moment.
Once the switch and spread is set, draw attention back towards the cards. Offer to demonstrate “One more ‘Golden Moment…” Slowly gather the tabled cards between the hands. You want to keep the cards partially covered and well separated to disguise the gilding as best you can. Now, draw attention to your hands—bring the cards more fully in to view—and smoothly square-up until the deck completely coalesces, it’s shiny GILT edges fully-formed and GOLDEN! It is a “Golden Moment!”
** 5. RIM SHOT **
This is almost the reverse of the above effect. Here, we actually STRIP THE GILT FROM THE DECK! This is done as a gag when offering the deck to a spectator for shuffling, or as a souvenir at the end of a set. The gilt edge is stripped away (looking now like a golden crown) with the joke… “Have you seen the price of gold today? Yikes. I’ll keep this…”
You’ll need to make a gilt-looking shell. It will be like an egg-ring—just a rim that encircles the deck perfectly, no top or bottom. Make this from very thin “shirt-box” plastic. Firstly secure a deck of cards with tape so that it becomes a solid block. Cut a length of the shirt-box plastic the thickness of your deck, and an inch longer than it’s circumference. Bend this strip around the deck, pulling it tight. The plastic should bend smoothly around the deck’s corners, taking their shape. Secure the band of plastic at one SHORT end with tape (or a drop of instant glue). Now, using the flame of a candle, gently and very carefully heat the plastic strip at all 4 of the deck’s corners. Be very careful not to singe or melt the plastic. This process will “set” the plastic so that the corners remain rounded when the deck is removed.
Once cooled, you should have a little skirt that sits neatly around the deck. Secure some shiny GOLD or SILVER paper from your stash of Christmas decorations. Alternately, browse your local “junk” shop. They usually have a large range of gilt-like gift and novelty items. Think gift bags, wine bags, wrapping paper, etc. Cut and fit a strip of this shiny paper to your pre-formed plastic ring. With a bit of luck you’ll now have a metallic-looking skirt that will match the hue of the gilt on your deck. I find that SILVER is a safer bet when it comes to colour-matching. There are many variables, and you may have to experiment a little to create a good match. Mylar is another medium to experiment with.
The performance entails you performing with the gilded deck and then switching it out for the plain deck with its gilt-rim. This is tabled for the finale.
A couple of convincers should be applied at this point: Pretend to adjust the squareness of the deck by boxing the fingers around it and jiggling a little, just as you would normally square a tabled deck. Secondly, remove the top card (it is easily lifted out of the rim) as you make the comment, “Have you seen the price of gold today? Yikes. I’ll keep this…”
Replace the top card and then lift the rim up and off the deck. It looks just like you’ve stripped a gilt crown from the cards! A truly funny and visual moment. Carefully place the crown in a pocket and then continue with your plan for the regular deck.
To finish, I’d like to suggest—that in a rather strange way—a gilded deck CAN look a little like an exotic can of sardines. There is some fun to be had here. I hope that this little article has convinced you that there are some magical effects inherent in the current gilding trend. Do consider adding a deck or two to your collection, and having a little play. We all just have to be careful not to “gild the lily.”
Love to hear your feedback. Don’t be shy about leaving a comment in the box below. And, please do check out my book, Machinations, right here at Vanishing Inc.
Back to blog homepage
Similar posts on the blog: